Editing the Godot Editor
23 Jun 2024This article will cover my experience playing with the Godot editor’s source code, and encapsulate practical examples of the lessons I try and teach juniors that are navigating a new code-base for the first time.
Preamble
If you want to get to the thick of things, skip this section. (If you’re anything like me, the first 10-15% of every youtube video or blog post being irrelevant to the overall content drives you nuts, so I’m trying to help you out!)
At the current stage of my career, mentoring has been one of my most important responsibilities. I frequently find myself helping juniors cultivate the techniques they’ll need to navigate a large, foreign code-base (though the code bases we put them on are hardly “large” in an absolute sense). Yet much of my recent work touches the same handful of repos, many of which are at least partly my brainchild. I couldn’t help but realize that it had been some years since I directly worked on a large, foreign code-base…
I pondered this on the way to my summer vacation, where I would be meeting up with my siblings, nieces, and nephews for the first time in half a year or so. A particular children’s exhibit we were visiting featured a Space-Invaders-like game, an my nephews penchant for crushing any high score I set inspired me to finally try out RayLib, and compare it with Godot 4.2.2.
My earnest interest in making games began when I was around 12 years old, and my sister bought me RPG Maker XP. While comfortable with a computer, I had no idea how programming languages worked, so I was resigned to tweaking existing Ruby scripts and programming logic through GUIs. Despite the tedium, I absolutely loved making tile maps:

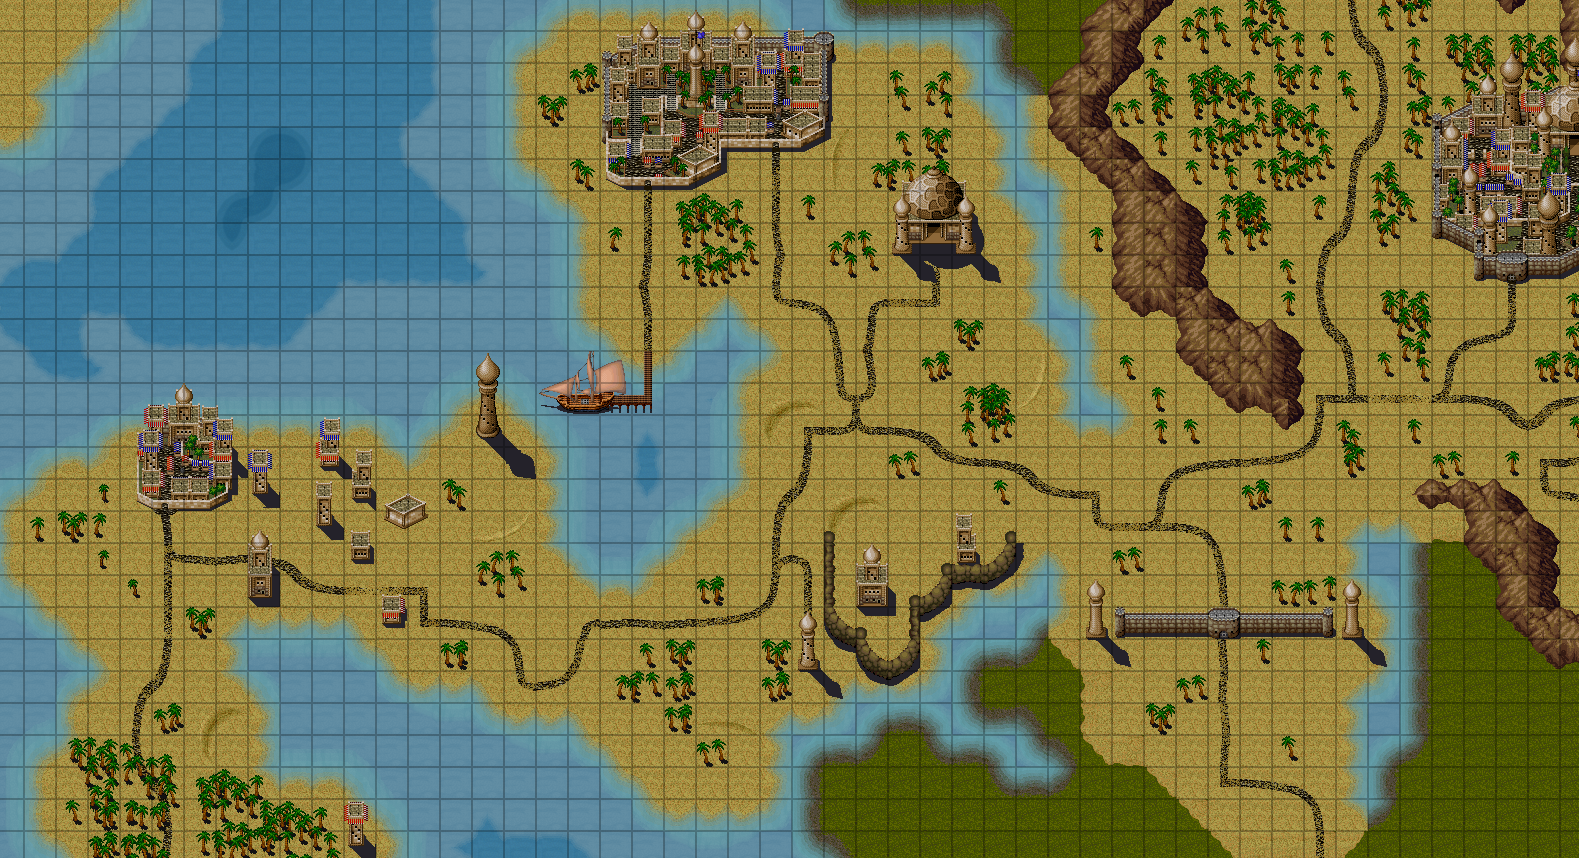
The Mission
The most important tool in my tool-belt was the ellipse brush. After a few clicks, it was virtually impossible to not create interesting looking islands:
This was my most desired missing feature when previously using Godot. To my dismay, despite all of the excellent tile map additions they had made in the past couple of years, an ellipse tool was still missing. And as such, my adventure begins…
From the Top Down
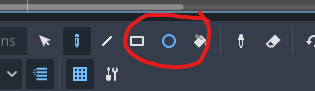
The great part about editing an application you have used before is that you have existing keywords and concepts you can map from functionality back to source code. For instance, looking at the “TileMap” editor, I can see there is a “Rect” button:

These make for easy keyword searches. Looking at the godot repo, I see the following directories:
|-- .github/
|-- core/
|-- doc/
|-- drivers/
|-- editor/
|-- main/
|-- misc/
|-- modules/
|-- platform/
|-- scene/
|-- servers/
|-- tests/
`-- thirdparty/
Clearly, I am working on the editor, so editor seems like a good bet for where
to search. The next directory down does not contain any files containing the
word “tile”, so my search continues:
|-- debugger/
|-- export/
|-- gui/
|-- icons/
|-- import/
|-- plugins/
|-- project_manager/
|-- themes/
`-- translations/
I know Godot supports plugins, often applications that support plugins implement
core functionality in terms of plugins (QtCreator immediately coming to mind),
so I have a lucky first guess and check plugins/, which contains a tiles/
sub-directory. I open tile_map_editor.cpp/.h and I’m off to the races!
I want to place my “Ellipse” brush next to the “Rect” brush, so I simply search for “rect” in the file, and vuala, the first text that greets me in the header file is:
Button *rect_tool_button = nullptr;
At this point, I feel confident that I’m at least on the right track, so now I
just need to see if I can build the code. Thankfully, the godot project has a
handy Compiling From Source
link directly in its README file. Using the magic of “Reading the Friendly
Manual,” I have Scons successfully building an x64 Debug project via Visual
Studio 2022*:
$ scons platform=windows vsproj=yes dev_build=yes
The docs even tell me I can build from within Visual Studio in the future. Neat!
*As a NeoVim snob, I am contractually obligated to tell you that I usually use neovim.
Adding a Button
All I do is copy and edit the line:
Button *rect_tool_button = nullptr;
Button *ellipse_tool_button = nullptr;
Next comes a little bit of boilerplate. I just look for where rect_tool_button
is used and make a version using ellipse_tool_button. Here’s an interesting
one: godot looks up an icon by name:
source_sort_button->set_icon(tiles_bottom_panel->get_editor_theme_icon(SNAME("Sort")));
select_tool_button->set_icon(tiles_bottom_panel->get_editor_theme_icon(SNAME("ToolSelect")));
paint_tool_button->set_icon(tiles_bottom_panel->get_editor_theme_icon(SNAME("Edit")));
line_tool_button->set_icon(tiles_bottom_panel->get_editor_theme_icon(SNAME("Line")));
rect_tool_button->set_icon(tiles_bottom_panel->get_editor_theme_icon(SNAME("Rectangle")));
bucket_tool_button->set_icon(tiles_bottom_panel->get_editor_theme_icon(SNAME("Bucket")));
Surely there’s an existing icon I can borrow. A lot of these names look pretty generic, but “Bucket” seems specific and related enough to narrow down a search:
$ git ls-files '*Bucket*'
editor/icons/Bucket.svg
One match! Nice and easy! I simply look in that directory for an image name “Elipse”, then “Circle”, and settle on “CircleShape2D”:
ellipse_tool_button->set_icon(tiles_bottom_panel->get_editor_theme_icon(SNAME("CircleShape2D")));
Compile (don’t forget to select the x64 configuration), debug, and I see some
success:
The Button Should Do Stuff
To start, I just want the button to do something. Duplicating the functionality of the Rect button seems like it should be pretty easy, so let’s start with that. This is a good time to illustrate a point:
1. When in Rome, do as the Romans do. In other words, try to make your addition look as similar to the existing code as you can.
bool TileMapEditorTilesPlugin::forward_canvas_gui_input(const Ref<InputEvent> &p_event) {
  // ...Omitted for brevity...
} else if (tool_buttons_group->get_pressed_button() == rect_tool_button || (tool_buttons_group->get_pressed_button() == paint_tool_button && Input::get_singleton()->is_key_pressed(Key::SHIFT) && Input::get_singleton()->is_key_pressed(Key::CMD_OR_CTRL))) {
	drag_type = DRAG_TYPE_RECT;
	drag_start_mouse_pos = mpos;
	drag_modified.clear();
} else if (tool_buttons_group->get_pressed_button() == bucket_tool_button) {
  // ...Omitted for brevity...
I see that we set a DRAG_TYPE_RECT. Do I understand what any of this is
really doing? No, not at all. However, I will probably want a
DRAG_TYPE_ELLIPSE eventually, so I’ll add one. This is a natural time to
discuss the next point:
2. Use the code-base’s preferred tools until when starting out. As you gain more experience and better understand tooling in general, you can break this rule*. However, to get up and running quickly, I want to know auto-complete and debugging will work out of the box.
Turns out, there are two separate enums named DragType. I updated the wrong
one at first by mistake. Rather than waiting on the re-compile, my editor
immediately told me there was a problem, which allowed me to fix my mistake
quickly while it was fresh in my mind.
*Really, there are exceptions to every rule, but you should understand the rules before breaking them.
Take a moment to notice the code I copied. The else if statement is much
shorter than the rect_tool_button equivalent.
} else if (tool_buttons_group->get_pressed_button() == ellipse_tool_button) {
The rect_tool_button uses the modifier keys. We don’t want to hijack this
behavior!
Input::get_singleton()->is_key_pressed(Key::SHIFT) &&
Input::get_singleton()->is_key_pressed(Key::CMD_OR_CTRL)))
3. You can’t know what every line of code does before making a change. However, you should do some basic due diligence. At a bare minimum, you should be reading the lines you are copying and modifying to try and gain a baseline understanding for how they work.
We continue searching for rect and updating with an ellipse version. This
eventually leads us to the _draw_rect function! My plan was to just duplicate
the existing functionality, so I’ll do so in _draw_ellipse. And…
Rats! What does this bug suggest? Well, I copied some parts properly, but must
have missed some others. The hunt continues… Turns out I just forgot to search
for DRAG_TYPE_RECT in the void TileMapEditorTilesPlugin::_stop_dragging()
function. Easy fix.
Who Ordered An Ellipse?
Now we need to edit our _draw_ellipse function to behave as advertised. This
is going to be the hard part. We need to understand the draw rect function:
HashMap<Vector2i, TileMapCell> TileMapEditorTilesPlugin::_draw_ellipse(Vector2i p_start_cell, Vector2i p_end_cell, bool p_erase) {
TileMap *tile_map = Object::cast_to<TileMap>(ObjectDB::get_instance(tile_map_id));
if (!tile_map) {
	return HashMap<Vector2i, TileMapCell>();
}

Ref<TileSet> tile_set = tile_map->get_tileset();
if (!tile_set.is_valid()) {
	return HashMap<Vector2i, TileMapCell>();
}

// Create the rect to draw.
Rect2i rect = Rect2i(p_start_cell, p_end_cell - p_start_cell).abs();
rect.size += Vector2i(1, 1);

// Get or create the pattern.
Ref<TileMapPattern> erase_pattern;
erase_pattern.instantiate();
erase_pattern->set_cell(Vector2i(0, 0), TileSet::INVALID_SOURCE, TileSetSource::INVALID_ATLAS_COORDS, TileSetSource::INVALID_TILE_ALTERNATIVE);
Ref<TileMapPattern> pattern = p_erase ? erase_pattern : selection_pattern;

HashMap<Vector2i, TileMapCell> err_output;
ERR_FAIL_COND_V(pattern->is_empty(), err_output);
Most of this code is common between _draw_rect and _draw_bucket_fill, so for
now we’ll assume they’re not relevant (sans the Rect2i lines).
// Compute the offset to align things to the bottom or right.
bool aligned_right = p_end_cell.x < p_start_cell.x;
bool valigned_bottom = p_end_cell.y < p_start_cell.y;
Vector2i offset = Vector2i(aligned_right ? -(pattern->get_size().x - (rect.get_size().x % pattern->get_size().x)) : 0, valigned_bottom ? -(pattern->get_size().y - (rect.get_size().y % pattern->get_size().y)) : 0);

HashMap<Vector2i, TileMapCell> output;
if (!pattern->is_empty()) {
	if (!p_erase && random_tile_toggle->is_pressed()) {
		// Paint a random tile.
		for (int x = 0; x < rect.size.x; x++) {
			for (int y = 0; y < rect.size.y; y++) {
				Vector2i coords = rect.position + Vector2i(x, y);
				output.insert(coords, _pick_random_tile(pattern));
			}
		}
	} else {
		// Paint the pattern.
		TypedArray<Vector2i> used_cells = pattern->get_used_cells();
		for (int x = 0; x <= rect.size.x / pattern->get_size().x; x++) {
			for (int y = 0; y <= rect.size.y / pattern->get_size().y; y++) {
				Vector2i pattern_coords = rect.position + Vector2i(x, y) * pattern->get_size() + offset;
				for (int j = 0; j < used_cells.size(); j++) {
					Vector2i coords = pattern_coords + used_cells[j];
					if (rect.has_point(coords)) {
						output.insert(coords, TileMapCell(pattern->get_cell_source_id(used_cells[j]), pattern->get_cell_atlas_coords(used_cells[j]), pattern->get_cell_alternative_tile(used_cells[j])));
					}
				}
			}
		}
	}
}

return output;
}
That doesn’t look too bad! But how would I draw an Ellipse? I’m neither a
computer graphics programmer by trade, nor the first person to encounter this
problem. Unfortunately, I can’t seem to locate an easy draw_ellipse or
draw_arc elsewhere in the Godot code-base that is easy for me to cannibalize.
A quick google search of “draw ellipse algorithm” tells me to learn more about
“Midpoint Algorithms,” specifically Bresenham’s. Time to hit the books! In
short, the algorithm seems to plot a point, see which pixel is closer, then
select that pixel. It looks like you can simplify a lot of the math as well,
particularly when working with integers. I just want to see an ellipse get
drawn, so I’m going to adapt Bresenham from zingl.
int32_t x0 = p_start_cell.x;
int32_t y0 = p_start_cell.y;
int32_t x1 = p_end_cell.x;
int32_t y1 = p_end_cell.y;
int32_t a = abs(x1-x0), b = abs(y1-y0), b1 = b&1; /* values of diameter */
int64_t dx = 4*(1-a)*b*b, dy = 4*(b1+1)*a*a; /* error increment */
int64_t err = dx+dy+b1*a*a, e2; /* error of 1.step */

if (x0 > x1) { x0 = x1; x1 += a; } /* if called with swapped points */
if (y0 > y1) y0 = y1; /* .. exchange them */
y0 += (b+1)/2; y1 = y0-b1;   /* starting pixel */
a *= 8*a; b1 = 8*b*b;

do {
	output.insert(Vector2i(x1, y0), TileMapCell(pattern->get_cell_source_id(used_cells[0]), pattern->get_cell_atlas_coords(used_cells[0]), pattern->get_cell_alternative_tile(used_cells[0])));
	output.insert(Vector2i(x0, y0), TileMapCell(pattern->get_cell_source_id(used_cells[0]), pattern->get_cell_atlas_coords(used_cells[0]), pattern->get_cell_alternative_tile(used_cells[0])));
	output.insert(Vector2i(x0, y1), TileMapCell(pattern->get_cell_source_id(used_cells[0]), pattern->get_cell_atlas_coords(used_cells[0]), pattern->get_cell_alternative_tile(used_cells[0])));
	output.insert(Vector2i(x1, y1), TileMapCell(pattern->get_cell_source_id(used_cells[0]), pattern->get_cell_atlas_coords(used_cells[0]), pattern->get_cell_alternative_tile(used_cells[0])));
	//setPixel(x1, y0); /*   I. Quadrant */
	//setPixel(x0, y0); /*  II. Quadrant */
	//setPixel(x0, y1); /* III. Quadrant */
	//setPixel(x1, y1); /*  IV. Quadrant */
	e2 = 2*err;
	if (e2 <= dy) { y0++; y1--; err += dy += a; }  /* y step */
	if (e2 >= dx || 2*err > dy) { x0++; x1--; err += dx += b1; } /* x step */
} while (x0 <= x1);

while (y0-y1 < b) {  /* too early stop of flat ellipses a=1 */
	output.insert(Vector2i(x0 - 1, y0), TileMapCell(pattern->get_cell_source_id(used_cells[0]), pattern->get_cell_atlas_coords(used_cells[0]), pattern->get_cell_alternative_tile(used_cells[0])));
	output.insert(Vector2i(x1 + 1, y0++), TileMapCell(pattern->get_cell_source_id(used_cells[0]), pattern->get_cell_atlas_coords(used_cells[0]), pattern->get_cell_alternative_tile(used_cells[0])));
	output.insert(Vector2i(x0 - 1, y1), TileMapCell(pattern->get_cell_source_id(used_cells[0]), pattern->get_cell_atlas_coords(used_cells[0]), pattern->get_cell_alternative_tile(used_cells[0])));
	output.insert(Vector2i(x1 + 1, y1--), TileMapCell(pattern->get_cell_source_id(used_cells[0]), pattern->get_cell_atlas_coords(used_cells[0]), pattern->get_cell_alternative_tile(used_cells[0])));
	//setPixel(x0-1, y0); /* -> finish tip of ellipse */
	//setPixel(x1+1, y0++);
	//setPixel(x0-1, y1);
	//setPixel(x1+1, y1--);
}
It’s not production quality (it’s missing tests, doesn’t account for selecting multiple source tiles, and doesn’t implement random tiles), but it kind of works! With very limited knowledge and a couple of hours (mostly spent on trying to understand an algorithm), I was able to tweak Godot to add something I desperately wanted for years.
The Godot developers deserve some serious props for organizing their project such that a game programming ignoramus like myself could get hacking on the editor so productively in such a short time. Since I didn’t run into an organic case to cite the last two lessons, I’ll expound upon them here:
4. Take the code at its word. If a function says that it accesses data from a tile map, great! You don’t need to look at the guts of that function until you have cause to suspect it’s doing something wrong, and only do so then. Computers are largely deterministic - use this fact to your advantage. The more you can file away into your box of “knowns,” the easier it will be to navigate a code-base.
5. Code tells a story. If something looks funky in the code, assume it
exists for good reason. It’s possible the author before you was a dumb dumb no
nothing, but it’s much safer to assume they added the weird statement for a very
specific reason. git blame can help you get to the bottom of mysteries as
well, so keep it in your tool belt!